Application configuration
Enable the IISIntegration components
- ASP.NET Core 2.x
CreateDefaultBuilder configures Kestrel as the web server and enables IIS integration by configuring the base path and port for the ASP.NET Core Module:
C#
public static IWebHost BuildWebHost(string[] args) =>
    WebHost.CreateDefaultBuilder(args)
        ...
The ASP.NET Core Module generates a dynamic port to assign to the back-end process. The
UseIISIntegration method picks up the dynamic port and configures Kestrel to listen on http://localhost:{dynamicPort}/. This overrides other URL configurations, such as calls to UseUrls or Kestrel's Listen API. Therefore, calls to UseUrls or Kestrel's Listen API aren't required when using the module. If UseUrls or Listen is called, Kestrel listens on the port specified when running the app without IIS.
IIS options
To configure IIS options, include a service configuration for IISOptions in ConfigureServices. In the following example, forwarding client certificates to the app to populate
To configure IIS options, include a service configuration for IISOptions in ConfigureServices. In the following example, forwarding client certificates to the app to populate
HttpContext.Connection.ClientCertificate is disabled:
C#
services.Configure<IISOptions>(options =>
{
    options.ForwardClientCertificate = false;
});
Proxy server and load balancer scenarios
The IIS Integration Middleware, which configures Forwarded Headers Middleware, and the ASP.NET Core Module are configured to forward the scheme (HTTP/HTTPS) and the remote IP address where the request originated. Additional configuration might be required for apps hosted behind additional proxy servers and load balancers.
web.config file
The web.config file configures the ASP.NET Core Module. Creating, transforming, and publishing web.config is handled by the .NET Core Web SDK (
Microsoft.NET.Sdk.Web). The SDK is set at the top of the project file:
XML
<Project Sdk="Microsoft.NET.Sdk.Web">
If a web.config file isn't present in the project, the file is created with the correct processPath and arguments to configure the ASP.NET Core Module and moved to published output.
If a web.config file is present in the project, the file is transformed with the correct processPath and arguments to configure the ASP.NET Core Module and moved to published output. The transformation doesn't modify IIS configuration settings in the file.
The web.config file may provide additional IIS configuration settings that control active IIS modules. For information on IIS modules that are capable of processing requests with ASP.NET Core apps, see the IIS modules topic.
To prevent the Web SDK from transforming the web.config file, use the <IsTransformWebConfigDisabled> property in the project file:
XML
<PropertyGroup>
  <IsTransformWebConfigDisabled>true</IsTransformWebConfigDisabled>
</PropertyGroup>
When disabling the Web SDK from transforming the file, the processPath and arguments should be manually set by the developer.
web.config file location
ASP.NET Core apps are hosted in a reverse proxy between IIS and the Kestrel server. In order to create the reverse proxy, the web.config file must be present at the content root path (typically the app base path) of the deployed app. This is the same location as the website physical path provided to IIS. The web.config file is required at the root of the app to enable the publishing of multiple apps using Web Deploy.
Sensitive files exist on the app's physical path, such as <assembly>.runtimeconfig.json, <assembly>.xml (XML Documentation comments), and <assembly>.deps.json. When the web.config file is present and and the site starts normally, IIS doesn't serve these sensitive files if they're requested. If the web.config file is missing, incorrectly named, or unable to configure the site for normal startup, IIS may serve sensitive files publicly.
The web.config file must be present in the deployment at all times, correctly named, and able to configure the site for normal start up. Never remove the web.config file from a production deployment.
IIS configuration
Windows Server operating systems
Enable the Web Server (IIS) server role and establish role services.
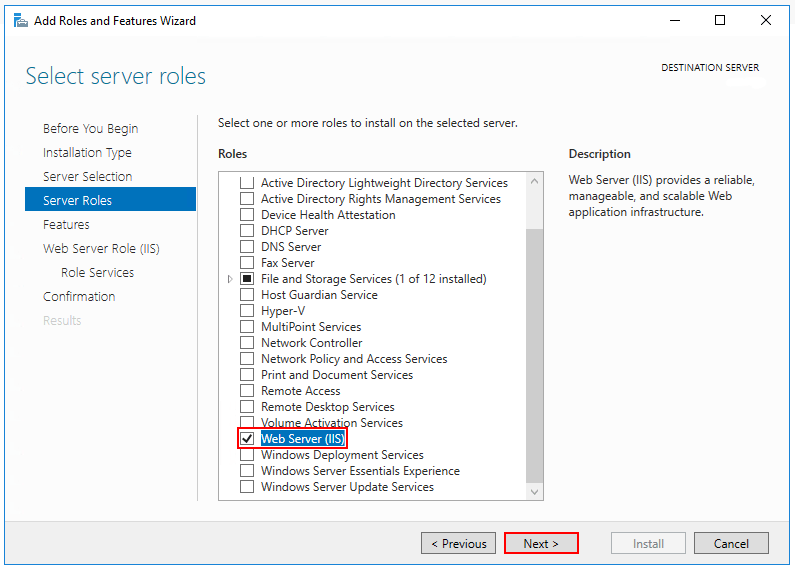
- Use the Add Roles and Features wizard from the Manage menu or the link in Server Manager. On the Server Rolesstep, check the box for Web Server (IIS).
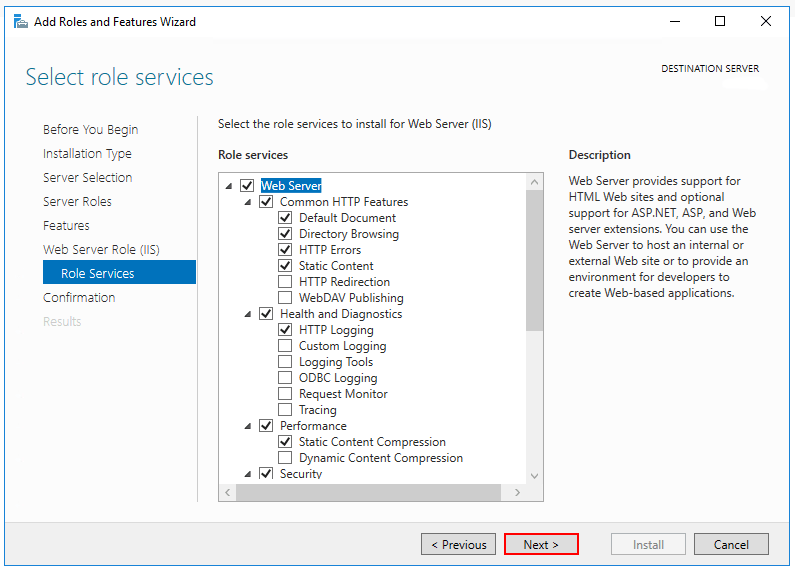
- After the Features step, the Role services step loads for Web Server (IIS). Select the IIS role services desired or accept the default role services provided.
 Windows Authentication (Optional)
To enable Windows Authentication, expand the following nodes: Web Server > Security. Select the Windows Authentication feature. For more information, see Windows Authentication <windowsAuthentication> and Configure Windows authentication.WebSockets (Optional)
WebSockets is supported with ASP.NET Core 1.1 or later. To enable WebSockets, expand the following nodes: Web Server > Application Development. Select the WebSocket Protocol feature. - Proceed through the Confirmation step to install the web server role and services. A server/IIS restart isn't required after installing the Web Server (IIS) role.
Windows desktop operating systems
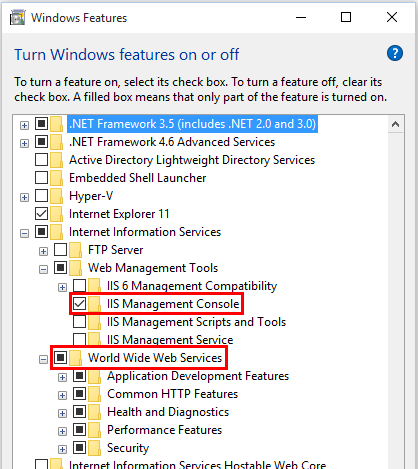
Enable the IIS Management Console and World Wide Web Services.
- Navigate to Control Panel > Programs > Programs and Features > Turn Windows features on or off (left side of the screen).
- Open the Internet Information Services node. Open the Web Management Tools node.
- Check the box for IIS Management Console.
- Check the box for World Wide Web Services.
- Accept the default features for World Wide Web Services or customize the IIS features.Windows Authentication (Optional)
To enable Windows Authentication, expand the following nodes: World Wide Web Services > Security. Select the Windows Authentication feature. For more information, see Windows Authentication <windowsAuthentication> and Configure Windows authentication.WebSockets (Optional)
WebSockets is supported with ASP.NET Core 1.1 or later. To enable WebSockets, expand the following nodes: World Wide Web Services > Application Development Features. Select the WebSocket Protocol feature. - If the IIS installation requires a restart, restart the system.
Install the .NET Core Hosting Bundle
- Install the .NET Core Hosting Bundle on the hosting system. The bundle installs the .NET Core Runtime, .NET Core Library, and the ASP.NET Core Module. The module creates the reverse proxy between IIS and the Kestrel server. If the system doesn't have an Internet connection, obtain and install the Microsoft Visual C++ 2015 Redistributable before installing the .NET Core Hosting Bundle.
- Navigate to the .NET All Downloads page.
- Select the latest non-preview .NET Core runtime from the list (.NET Core > Runtime > .NET Core Runtime x.y.z). Unless you intend to work with preview software, avoid runtimes that have the word "preview" in their link text.
- On the .NET Core runtime download page under Windows, select the Hosting Bundle Installer link to download the .NET Core Hosting Bundle.
Important! If the Hosting Bundle is installed before IIS, the bundle installation must be repaired. Run the Hosting Bundle installer again after installing IIS.To prevent the installer from installing x86 packages on an x64 OS, run the installer from an administrator command prompt with the switchOPT_NO_X86=1. - Restart the system or execute net stop was /y followed by net start w3svc from a command prompt. Restarting IIS picks up a change to the system PATH made by the installer.
Install Web Deploy when publishing with Visual Studio
When deploying apps to servers with Web Deploy, install the latest version of Web Deploy on the server. To install Web Deploy, use the Web Platform Installer (WebPI). The preferred method is to use WebPI. WebPI offers a standalone setup and a configuration for hosting providers.
Create the IIS site
- On the hosting system, create a folder to contain the app's published folders and files.
- Within the new folder, create a logs folder to hold ASP.NET Core Module stdout logs when stdout logging is enabled. If the app is deployed with a logs folder in the payload, skip this step. For instructions on how to enable MSBuild to create the logs folder automatically when the project is built locally.
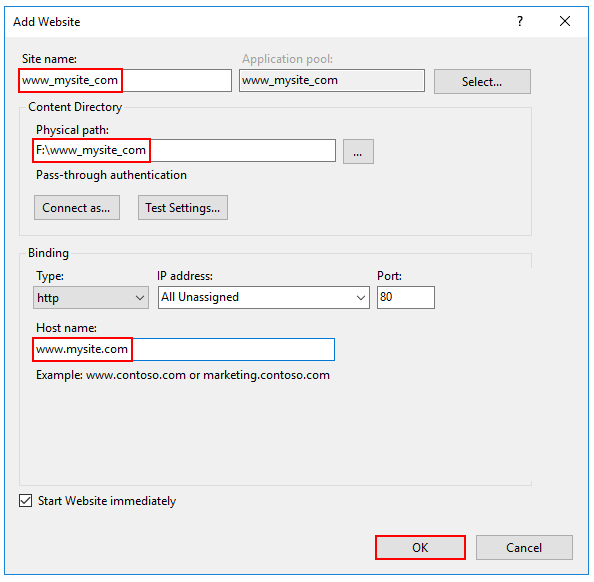
- In IIS Manager, open the server's node in the Connections panel. Right-click the Sites folder. Select Add Websitefrom the contextual menu.
- Provide a Site name and set the Physical path to the app's deployment folder. Provide the Binding configuration and create the website by selecting OK:
 WarningTop-level wildcard bindings (
http://*:80/andhttp://+:80) should not be used. Top-level wildcard bindings can open up your app to security vulnerabilities. This applies to both strong and weak wildcards. Use explicit host names rather than wildcards. Subdomain wildcard binding (for example,*.mysub.com) doesn't have this security risk if you control the entire parent domain (as opposed to*.com, which is vulnerable). - Under the server's node, select Application Pools.
- Right-click the site's app pool and select Basic Settings from the contextual menu.
- In the Edit Application Pool window, set the .NET CLR version to No Managed Code:
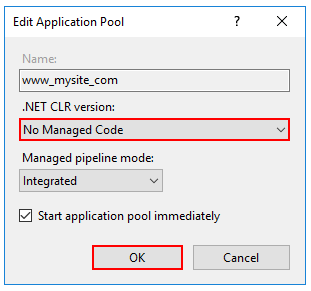 ASP.NET Core runs in a separate process and manages the runtime. ASP.NET Core doesn't rely on loading the desktop CLR. Setting the .NET CLR version to No Managed Code is optional.
 - Confirm the process model identity has the proper permissions.If the default identity of the app pool (Process Model > Identity) is changed from ApplicationPoolIdentity to another identity, verify that the new identity has the required permissions to access the app's folder, database, and other required resources. For example, the app pool requires read and write access to folders where the app reads and writes files.
Deploy the app
Deploy the app to the folder created on the hosting system. Web Deploy is the recommended mechanism for deployment.
Web Deploy with Visual Studio
If the hosting provider provides a Publish Profile or support for creating one, download their profile and import it using the Visual Studio Publish dialog.
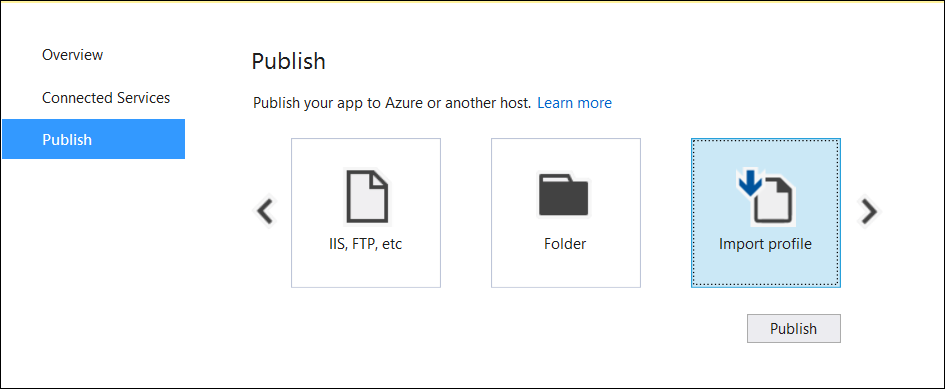
Web Deploy outside of Visual Studio
Web Deploy can also be used outside of Visual Studio from the command line.
Alternatives to Web Deploy
Use any of several methods to move the app to the hosting system, such as manual copy, Xcopy, Robocopy, or PowerShell.
Browse the website
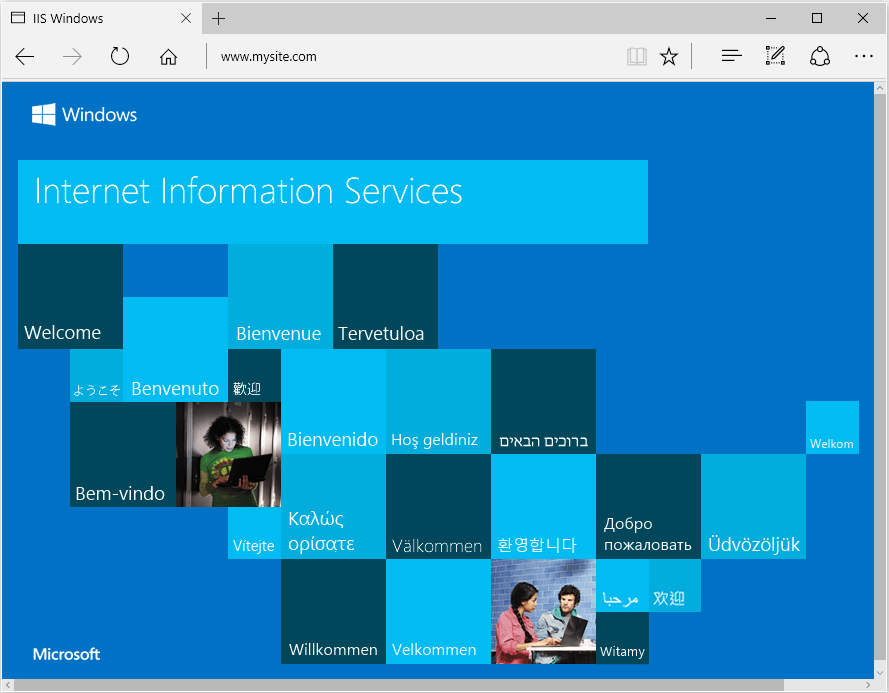
Application Pools
When hosting multiple websites on a server, isolate the apps from each other by running each app in its own app pool. The IIS Add Website dialog defaults to this configuration. When Site name is provided, the text is automatically transferred to the Application pool textbox. A new app pool is created using the site name when the site is added.
Application Pool Identity
An app pool identity account allows an app to run under a unique account without having to create and manage domains or local accounts. On IIS 8.0 or later, the IIS Admin Worker Process (WAS) creates a virtual account with the name of the new app pool and runs the app pool's worker processes under this account by default. In the IIS Management Console under Advanced Settings for the app pool, ensure that the Identity is set to use ApplicationPoolIdentity:
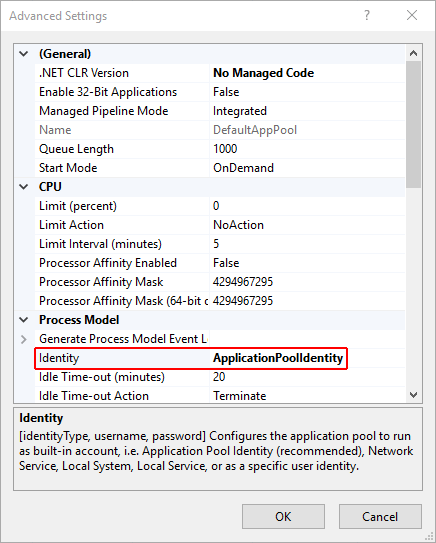
The IIS management process creates a secure identifier with the name of the app pool in the Windows Security System. Resources can be secured using this identity. However, this identity isn't a real user account and doesn't show up in the Windows User Management Console.
If the IIS worker process requires elevated access to the app, modify the Access Control List (ACL) for the directory containing the app:
- Open Windows Explorer and navigate to the directory.
- Right-click on the directory and select Properties.
- Under the Security tab, select the Edit button and then the Add button.
- Select the Locations button and make sure the system is selected.
- Enter IIS AppPool\<app_pool_name> in Enter the object names to select area. Select the Check Names button. For the DefaultAppPool check the names using IIS AppPool\DefaultAppPool. When the Check Names button is selected, a value of DefaultAppPool is indicated in the object names area. It isn't possible to enter the app pool name directly into the object names area. Use the IIS AppPool\<app_pool_name> format when checking for the object name.
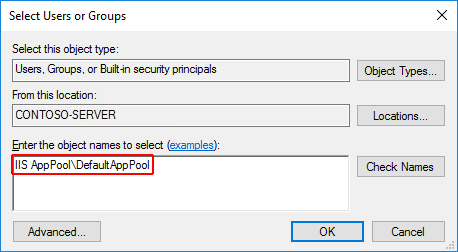
- Select OK.
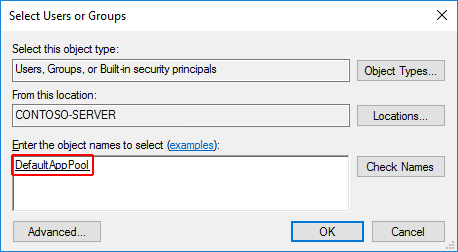
- Read & execute permissions should be granted by default. Provide additional permissions as needed.
Access can also be granted at a command prompt using the ICACLS tool. Using the DefaultAppPool as an example, the following command is used:
console
ICACLS C:\sites\MyWebApp /grant "IIS AppPool\DefaultAppPool":F
Comments
Post a Comment