Introduction:
Here we will learn how to create web api in asp.net core mvc with example or asp.net core mvc rest web api tutorial with example or asp.net core mvc restful api with example or implement web api usingasp.net core with examples. By using asp.net core mvc web api templates we can easily implement restful web api services based on our requirements.
To create web api first we need to create new project for that Open visual studio à Go to File menu àselect New à Project like as shown below
 |
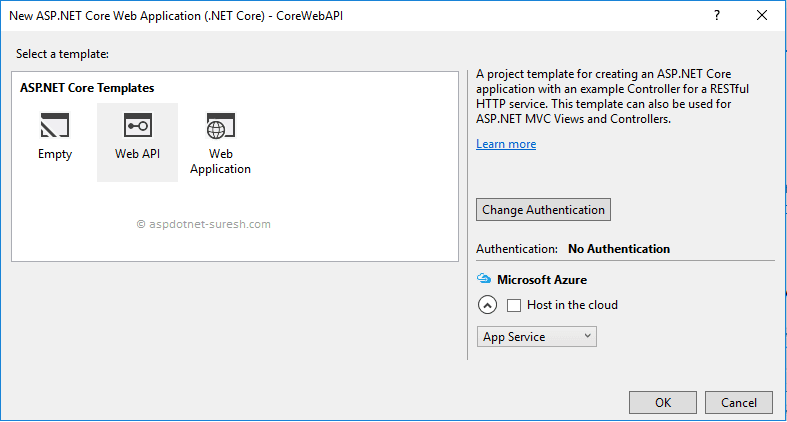
Now from web templates select Asp.Net Core Web Application (.NET Core) and give name (CoreWebAPI) to the project and click OK button like as shown below.
 |
Once we click OK button new template will open in that select Web API from Asp.Net Core templates like as shown below
 |
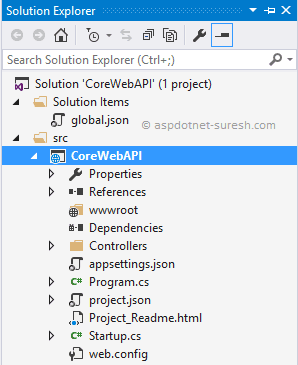
Our asp.net core web api project structure will be like as shown below
 |
Now add new “Models” folder in project by right click on project select Add à New Folder like as shown below
 |
Now add new class “UserDetails” in Models folder and write the code like as shown below
namespace CoreWebAPI.Models
{
public class UserDetails
{
public int userid { get; set; }
public string username { get; set; }
public string education { get; set; }
public string location { get; set; }
}
}
|
In .net core we need to add repository class files in our project to maintain our application logic and interface layer to achieve dependency injection. For that right click on your Models folder and add new class file and give name as “IUserRepository” and writhe code like as shown below
IUserRepository.cs
using System.Collections.Generic;
namespace CoreWebAPI.Models
{
public interface IUserRepository
{
List<UserDetails> AddUser(UserDetails user);
IEnumerable<UserDetails> GetUsers();
UserDetails FindUser(int userid);
}
}
|
We are done with interface layer now we need to create application logic file for that right click onModels folder à add new class file à give name as “UserRepository” and write the code like as shown below (Here we are inheriting properties from IUserRepository interface file).
UserRepository.cs
using System.Collections.Generic;
namespace CoreWebAPI.Models
{
public class UserRepository:IUserRepository
{
List<UserDetails> _userinfo = new List<UserDetails>();
public UserRepository()
{
AddUser(new UserDetails { userid=1,username="Suresh Dasari",education="B.Tech",location="Chennai" });
}
public List<UserDetails> AddUser(UserDetails user)
{
_userinfo.Add(user);
return _userinfo;
}
public IEnumerable<UserDetails> GetUsers()
{
return _userinfo;
}
public UserDetails FindUser(int userid)
{
return _userinfo.Find(x => x.userid == userid);
}
}
}
|
Now we need to register our repository application logic file and interface layers with dependency injection container for that open Startup.cs file and add following namespace to access Models folder references
using CoreWebAPI.Models;
|
In ConfigureServices method of Startup.cs file add the highlighted code like as shown below
Startup.cs
public void ConfigureServices(IServiceCollection services)
{
// Add framework services.
services.AddMvc();
services.AddSingleton<IUserRepository, UserRepository>();
}
|
Now we will add new controller to write our custom methods for that right click on Controllers folder and select Add à New Item à In new items select Web API Controller class template and give name as “UserController” like as shown below.
 |
Now open UserController file and write the code like as shown below
UserController.cs
using System;
using System.Collections.Generic;
using Microsoft.AspNetCore.Mvc;
using CoreWebAPI.Models;
namespace CoreWebAPI.Controllers
{
[Route("api/[controller]")]
public class UserController : Controller
{
public new IUserRepository User { get; set; }
public UserController(IUserRepository _user)
{
User = _user;
}
// GET: api/values
[HttpGet]
public IEnumerable<UserDetails> GetAllUsers()
{
return User.GetUsers();
}
// GET api/values/5
[HttpGet("{userid}")]
public IActionResult GetUserById(string userid)
{
if(!string.IsNullOrEmpty(userid))
{
var result = User.FindUser(Convert.ToInt32(userid));
if (result == null)
return NoContent();
else
return new ObjectResult(result);
}
else
{
return BadRequest();
}
}
// POST api/values
[HttpPost]
public IActionResult insertuserdetails([FromBody]UserDetails userinfo)
{
if (userinfo == null)
return BadRequest();
else
{
var results= User.AddUser(userinfo);
return new OkObjectResult(results);
}
}
}
}
|
We can access above controller methods using the URL’s like as shown below.
GET Requests
/api/user – Get all the users
/api/user/{userid} – Get user details based on userid
Post Request
/api/user – It insert user details.
Now we will test our controller methods with using postman or fiddler.
Get all users (/api/user)
 |
Get User Details based on userid (/api/user/1)
 |
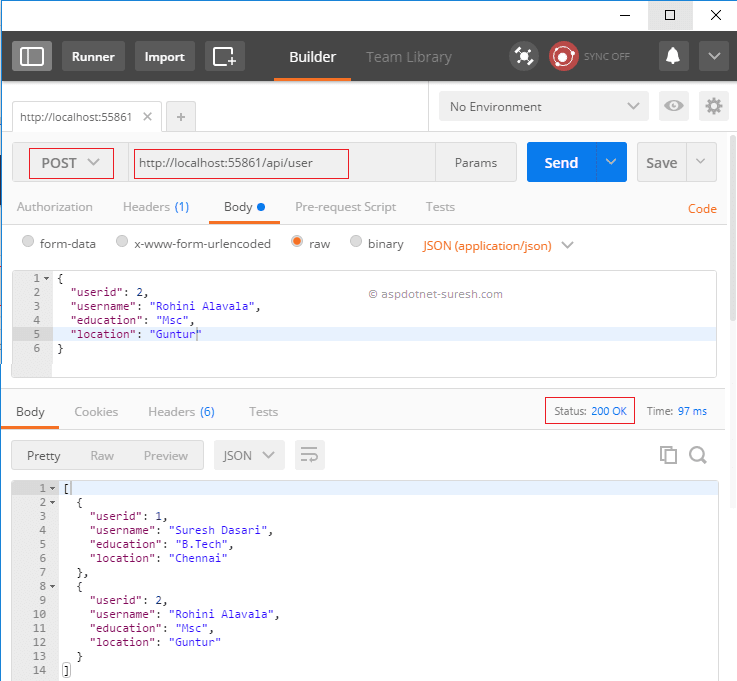
Insert and Show User Details (/api/user)
 |
Comments
Post a Comment