
ASP.NET MVC 5 - Adding a Model

Adding Model Classes

In Solution Explorer, right click the Models folder, select Add, and then select Class.
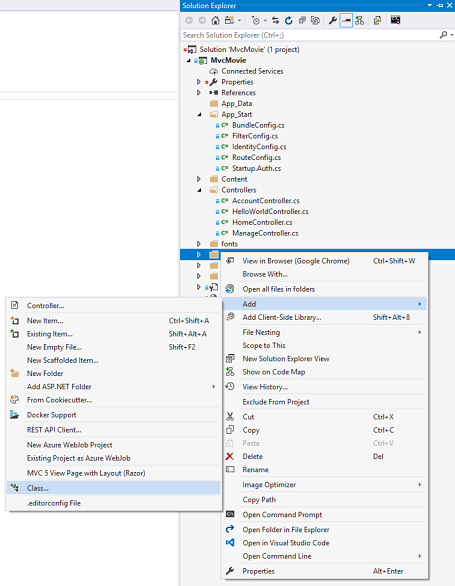
Enter the class name "Movie".
Add the following five properties to the Movie class:
C#
using System;

namespace MvcMovie.Models
{
    public class Movie
    {
        public int ID { get; set; }
        public string Title { get; set; }
        public DateTime ReleaseDate { get; set; }
        public string Genre { get; set; }
        public decimal Price { get; set; }
    }
}
We'll use the Movie class to represent movies in a database. Each instance of a Movie object will correspond to a row within a database table, and each property of the Movie class will map to a column in the table.1
Note: In order to use System.Data.Entity, and the related class, you need to install the Entity Framework NuGet Package. Follow the link for further instructions.
In the same file, add the following MovieDBContext class:4
C#
using System;
using System.Data.Entity;

namespace MvcMovie.Models
{
    public class Movie
    {
        public int ID { get; set; }
        public string Title { get; set; }
        public DateTime ReleaseDate { get; set; }
        public string Genre { get; set; }
        public decimal Price { get; set; }
    }

    public class MovieDBContext : DbContext
    {
        public DbSet<Movie> Movies { get; set; }
    }
}
The MovieDBContext class represents the Entity Framework movie database context, which handles fetching, storing, and updating Movie class instances in a database. The MovieDBContext derives from the DbContext base class provided by the Entity Framework.
In order to be able to reference DbContext and DbSet, you need to add the following using statement at the top of the file:1
C#
using System.Data.Entity;
You can do this by manually adding the using statement, or you can hover over the red squiggly lines, click Show potential fixes and click using System.Data.Entity;
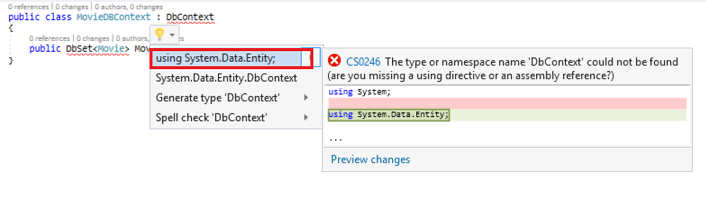
Note: Several unused using statements have been removed. Visual Studio will show unused dependencies as gray. You can remove unnused dependencies by hovering over the gray dependencies, click Show potential fixes and click Remove Unused Usings.
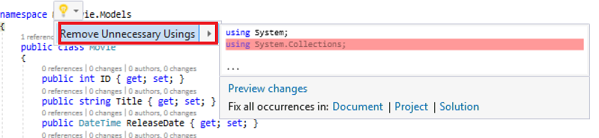
+

Comments

Popular posts from this blog

ASP.NET Core - Create New Project

You can start building a new ASP.NET Core Application from the  File → New Project  menu option. On the New Project dialog box, you will see the following three different templates for Web projects − ASP.NET Web Application  − The simple ASP.NET application templates . ASP.NET Core Web Application (.NET Core)  − This will start you with a crossplatform compatible project that runs on the .NET Core framework. ASP.NET Core Web Application (.NET Framework)  − This starts a new project that runs on the standard .NET Framework on Windows. In the left pane, select  Templates → Visual C# → Web  and in the middle pane select the ASP.NET Core Web Application (.NET Core) template. Let us call this application  FirstAppDemo  and also specify the Location for your ASP.NET Core project and then Click OK. In the above dialog box, you can select a specific template for the ASP.NET application from the available ASP.NET Core Templates. ...

ASP.NET Core - Attribute Routes

Learn another approach to routing and that is attribute-based routing. With attribute-based routing, we can use C# attributes on our controller classes and on the methods internally in these classes. These attributes have metadata that tell ASP.NET Core when to call a specific controller. It is an alternative to convention-based routing. Routes are evaluated in the order that they appear, the order that you register them in, but it's quite common to map multiple routes particularly if you want to have different parameters in the URL or if you want to have different literals in the URL. Example Let us take a simple example. Open the  FirstAppDemo  project and run the application in the browser. When you specify  /about , it will produce the following output − What we want here is that when we specify  /about , the application should invoke the Phone action of the AboutController. Here, we can enforce some explicit routes for this controller using a Ro...

Features of Node.js

Following are some of the important features that make Node.js the first choice of software architects. Asynchronous and Event Driven  − All APIs of Node.js library are asynchronous, that is, non-blocking. It essentially means a Node.js based server never waits for an API to return data. The server moves to the next API after calling it and a notification mechanism of Events of Node.js helps the server to get a response from the previous API call. Very Fast  − Being built on Google Chrome's V8 JavaScript Engine, Node.js library is very fast in code execution. Single Threaded but Highly Scalable  − Node.js uses a single threaded model with event looping. Event mechanism helps the server to respond in a non-blocking way and makes the server highly scalable as opposed to traditional servers which create limited threads to handle requests. Node.js uses a single threaded program and the same program can provide service to a much larger number of requests than t...