Build the application before going on to the next step. If you don't build the application, you'll get an error adding a controller.
4
In Solution Explorer, right-click the Controllers folder and then click Add, then Controller.
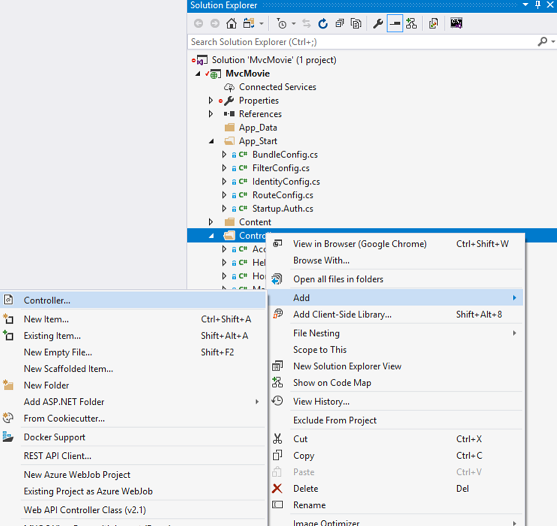
In the Add Scaffold dialog box, click MVC 5 Controller with views, using Entity Framework, and then click Add.1

- Select Movie (MvcMovie.Models) for the Model class.
- Select MovieDBContext (MvcMovie.Models) for the Data context class.
- For the Controller name enter MoviesController.The image below shows the completed dialog.
2

Click Add. (If you get an error, you probably didn't build the application before starting adding the controller.) Visual Studio creates the following files and folders:2
- A MoviesController.cs file in the Controllers folder.
- A Views\Movies folder.
- Create.cshtml, Delete.cshtml, Details.cshtml, Edit.cshtml, and Index.cshtml in the new Views\Movies folder.
Visual Studio automatically created the CRUD (create, read, update, and delete) action methods and views for you (the automatic creation of CRUD action methods and views is known as scaffolding). You now have a fully functional web application that lets you create, list, edit, and delete movie entries.1
Run the application and click on the MVC Movie link (or browse to the
Movies controller by appending /Movies to the URL in the address bar of your browser). Because the application is relying on the default routing (defined in the App_Start\RouteConfig.cs file), the browser request http://localhost:xxxxx/Movies is routed to the default Index action method of the Movies controller. In other words, the browser request http://localhost:xxxxx/Movies is effectively the same as the browser request http://localhost:xxxxx/Movies/Index. The result is an empty list of movies, because you haven't added any yet.7
Creating a Movie
Select the Create New link. Enter some details about a movie and then click the Create button.

Clicking the Create button causes the form to be posted to the server, where the movie information is saved in the database. You're then redirected to the /Movies URL, where you can see the newly created movie in the listing.

Create a couple more movie entries. Try the Edit, Details, and Delete links, which are all functional.
Examining the Generated Code
Open the Controllers\MoviesController.cs file and examine the generated
Index method. A portion of the movie controller with the Index method is shown below.
C#
public class MoviesController : Controller
{
    private MovieDBContext db = new MovieDBContext();

    // GET: /Movies/
    public ActionResult Index()
    {
        return View(db.Movies.ToList());
    }
A request to the
Movies controller returns all the entries in the Movies table and then passes the results to the Indexview. The following line from the MoviesController class instantiates a movie database context, as described previously. You can use the movie database context to query, edit, and delete movies.
C#
private MovieDBContext db = new MovieDBContext();
Strongly Typed Models and the @model Keyword
2
In the Controllers\MoviesController.cs file examine the generated
Details method. The Details method is shown below.
C#
public ActionResult Details(int? id)
{
    if (id == null)
    {
        return new HttpStatusCodeResult(HttpStatusCode.BadRequest);
    }
    Movie movie = db.Movies.Find(id);
    if (movie == null)
    {
        return HttpNotFound();
    }
    return View(movie);
}
The
id parameter is generally passed as route data, for example http://localhost:1234/movies/details/1 will set the controller to the movie controller, the action to details and the id to 1. You could also pass in the id with a query string as follows:http://localhost:1234/movies/details?id=1
If a
Movie is found, an instance of the Movie model is passed to the Details view:
C#
return View(movie);
Examine the contents of the Views\Movies\Details.cshtml file:
CSHTML
@model MvcMovie.Models.Movie

@{
    ViewBag.Title = "Details";
}

<h2>Details</h2>

<div>
    <h4>Movie</h4>
<hr />
    <dl class="dl-horizontal">
        <dt>
            @Html.DisplayNameFor(model => model.Title)
        </dt>
         @*Markup omitted for clarity.*@
    </dl>
</div>
<p>
    @Html.ActionLink("Edit", "Edit", new { id = Model.ID }) |
    @Html.ActionLink("Back to List", "Index")
</p>
By including a
@model statement at the top of the view template file, you can specify the type of object that the view expects. When you created the movie controller, Visual Studio automatically included the following @model statement at the top of the Details.cshtml file:1
CSHTML
@model MvcMovie.Models.Movie
This
@model directive allows you to access the movie that the controller passed to the view by using a Model object that's strongly typed. For example, in the Details.cshtml template, the code passes each movie field to the DisplayNameForand DisplayFor HTML Helpers with the strongly typed Model object. The Create and Edit methods and view templates also pass a movie model object.
Examine the Index.cshtml view template and the
Index method in the MoviesController.cs file. Notice how the code creates a List object when it calls the View helper method in the Index action method. The code then passes this Movies list from the Index action method to the view:1
C#
public ActionResult Index()
{
    return View(db.Movies.ToList());
}
When you created the movie controller, Visual Studio automatically included the following
@model statement at the top of the Index.cshtml file:2
CSHTML
@model IEnumerable<MvcMovie.Models.Movie>
This
@model directive allows you to access the list of movies that the controller passed to the view by using a Modelobject that's strongly typed. For example, in the Index.cshtml template, the code loops through the movies by doing a foreach statement over the strongly typed Model object:
CSHTML
@foreach (var item in Model) {
    <tr>
        <td>
            @Html.DisplayFor(modelItem => item.Title)
        </td>
        <td>
            @Html.DisplayFor(modelItem => item.ReleaseDate)
        </td>
        <td>
            @Html.DisplayFor(modelItem => item.Genre)
        </td>
        <td>
            @Html.DisplayFor(modelItem => item.Price)
        </td>
         <th>
            @Html.DisplayFor(modelItem => item.Rating)
        </th>
        <td>
            @Html.ActionLink("Edit", "Edit", new { id=item.ID }) |
            @Html.ActionLink("Details", "Details", new { id=item.ID })  |
            @Html.ActionLink("Delete", "Delete", new { id=item.ID })
        </td>
    </tr>
}
Because the
Model object is strongly typed (as an IEnumerable<Movie> object), each item object in the loop is typed as Movie. Among other benefits, this means that you get compile-time checking of the code and full IntelliSense support in the code editor: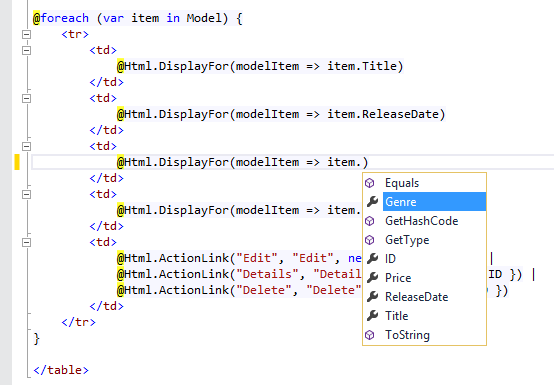
Working with SQL Server LocalDB
Entity Framework Code First detected that the database connection string that was provided pointed to a
Moviesdatabase that didn't exist yet, so Code First created the database automatically. You can verify that it's been created by looking in the App_Data folder. If you don't see the Movies.mdf file, click the Show All Files button in the Solution Explorer toolbar, click the Refresh button, and then expand the App_Data folder.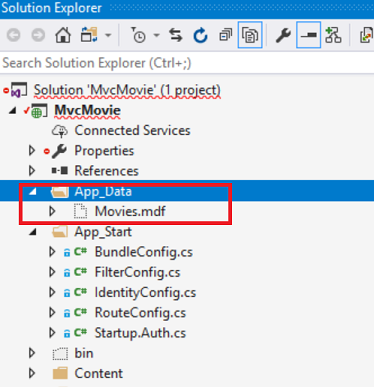
Double-click Movies.mdf to open SERVER EXPLORER, then expand the Tables folder to see the Movies table. Note the key icon next to ID. By default, EF will make a property named ID the primary key. 1

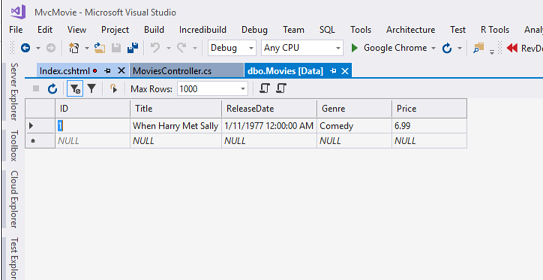
Right-click the
Movies table and select Show Table Data to see the data you created.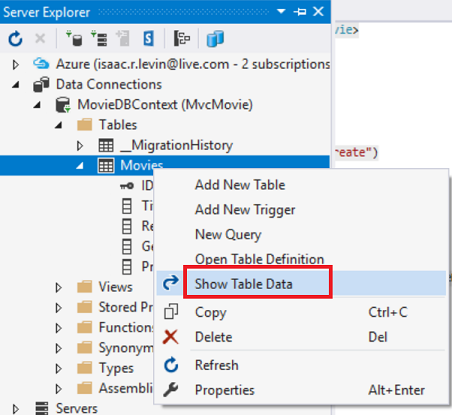
Right-click the
Movies table and select Open Table Definition to see the table structure that Entity Framework Code First created for you.
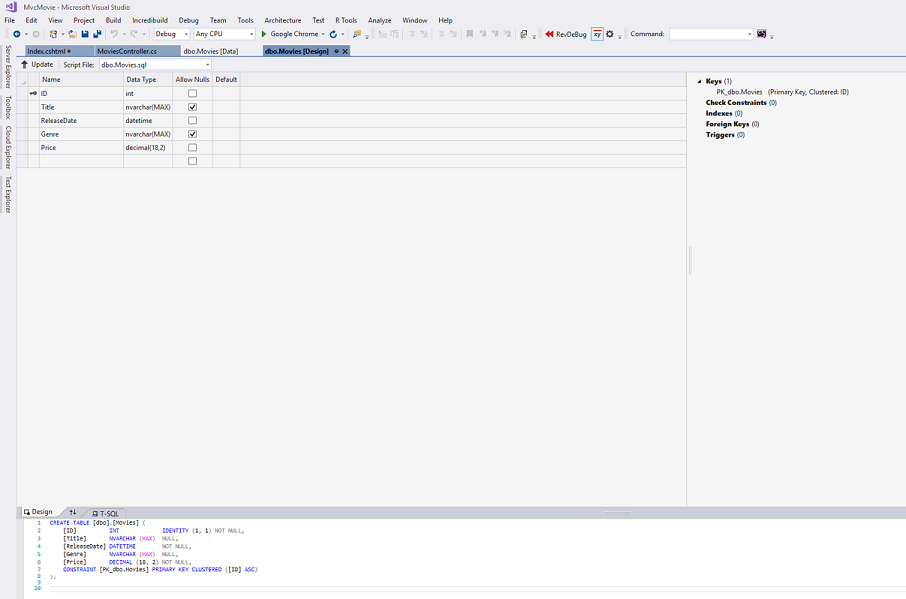
Notice how the schema of the
Movies table maps to the Movie class you created earlier. Entity Framework Code First automatically created this schema for you based on your Movie class.
When you're finished, close the connection by right clicking MovieDBContext and selecting Close Connection. (If you don't close the connection, you might get an error the next time you run the project).

Comments
Post a Comment